Curated blog with news, events, listings, jobs and exciting stories about web design & web development.
How To Easily Create Amazon Product Comparison Tables In WordPress
In this day and age, we generally have consumer goods in abundance. There are exceptions, of course, such as a shortage of toilet paper during the initial phase of the Corona pandemic or supermarkets selling out of flour and sunflower oil caused by the war in Ukraine (at least in Germany). At this point it is also worth mentioning the worldwide shortage of microchips, which is having a massive impact on the automotive and electronics industries, for example. So what is my point? As a rule, we have an oversupply, which is both a curse and a blessing. Who is supposed to keep track of it all? Many people inform themselves online and look for reviews that list not only the prices but also the advantages and disadvantages of a product, including alternatives. For this reason, there are dedicated blogs and sites that specialise in the respective areas. Personally, we recently looked at a site about cordless hoovers. This site is about nothing else. The site operator exclusively tests hoovers from various manufacturers and publishes reviews as well as YouTube videos – and does this full-time thanks to affiliate income!
However, since many people suffer from busy schedules (both private and professional) and corresponding time pressure, they naturally want to find out about products as quickly as possible. And what could be better than comparison tables – for example for products listed on Amazon?
In this article, we will take a look at two free and paid methods for adding such product comparison tables for Amazon to your WordPress site.
Free Table Block
The first option is suitable for users who have just started blogging and rarely need tables or only relatively simple tables. For example, you can insert a table relatively quickly in the WordPress editor with a free table block, which you can then fill manually with the product data. After you have done this, you should not forget to insert an affiliate link or, even better an eye-catching call-to-action button (aka CTA).
However, this approach has a significant disadvantage that will cost you a lot of time and effort. More on this below in our conclusion.
AAWP
For everyone else, there is AAWP, THE popular WordPress plugin for Amazon Affiliates. In just a few minutes, you can easily create visually appealing comparison tables that add enormous value for your audience. Of course, no coding skills or a developer are required here either. You only need to be able to install a plugin. But that shouldn’t be a problem, should it?
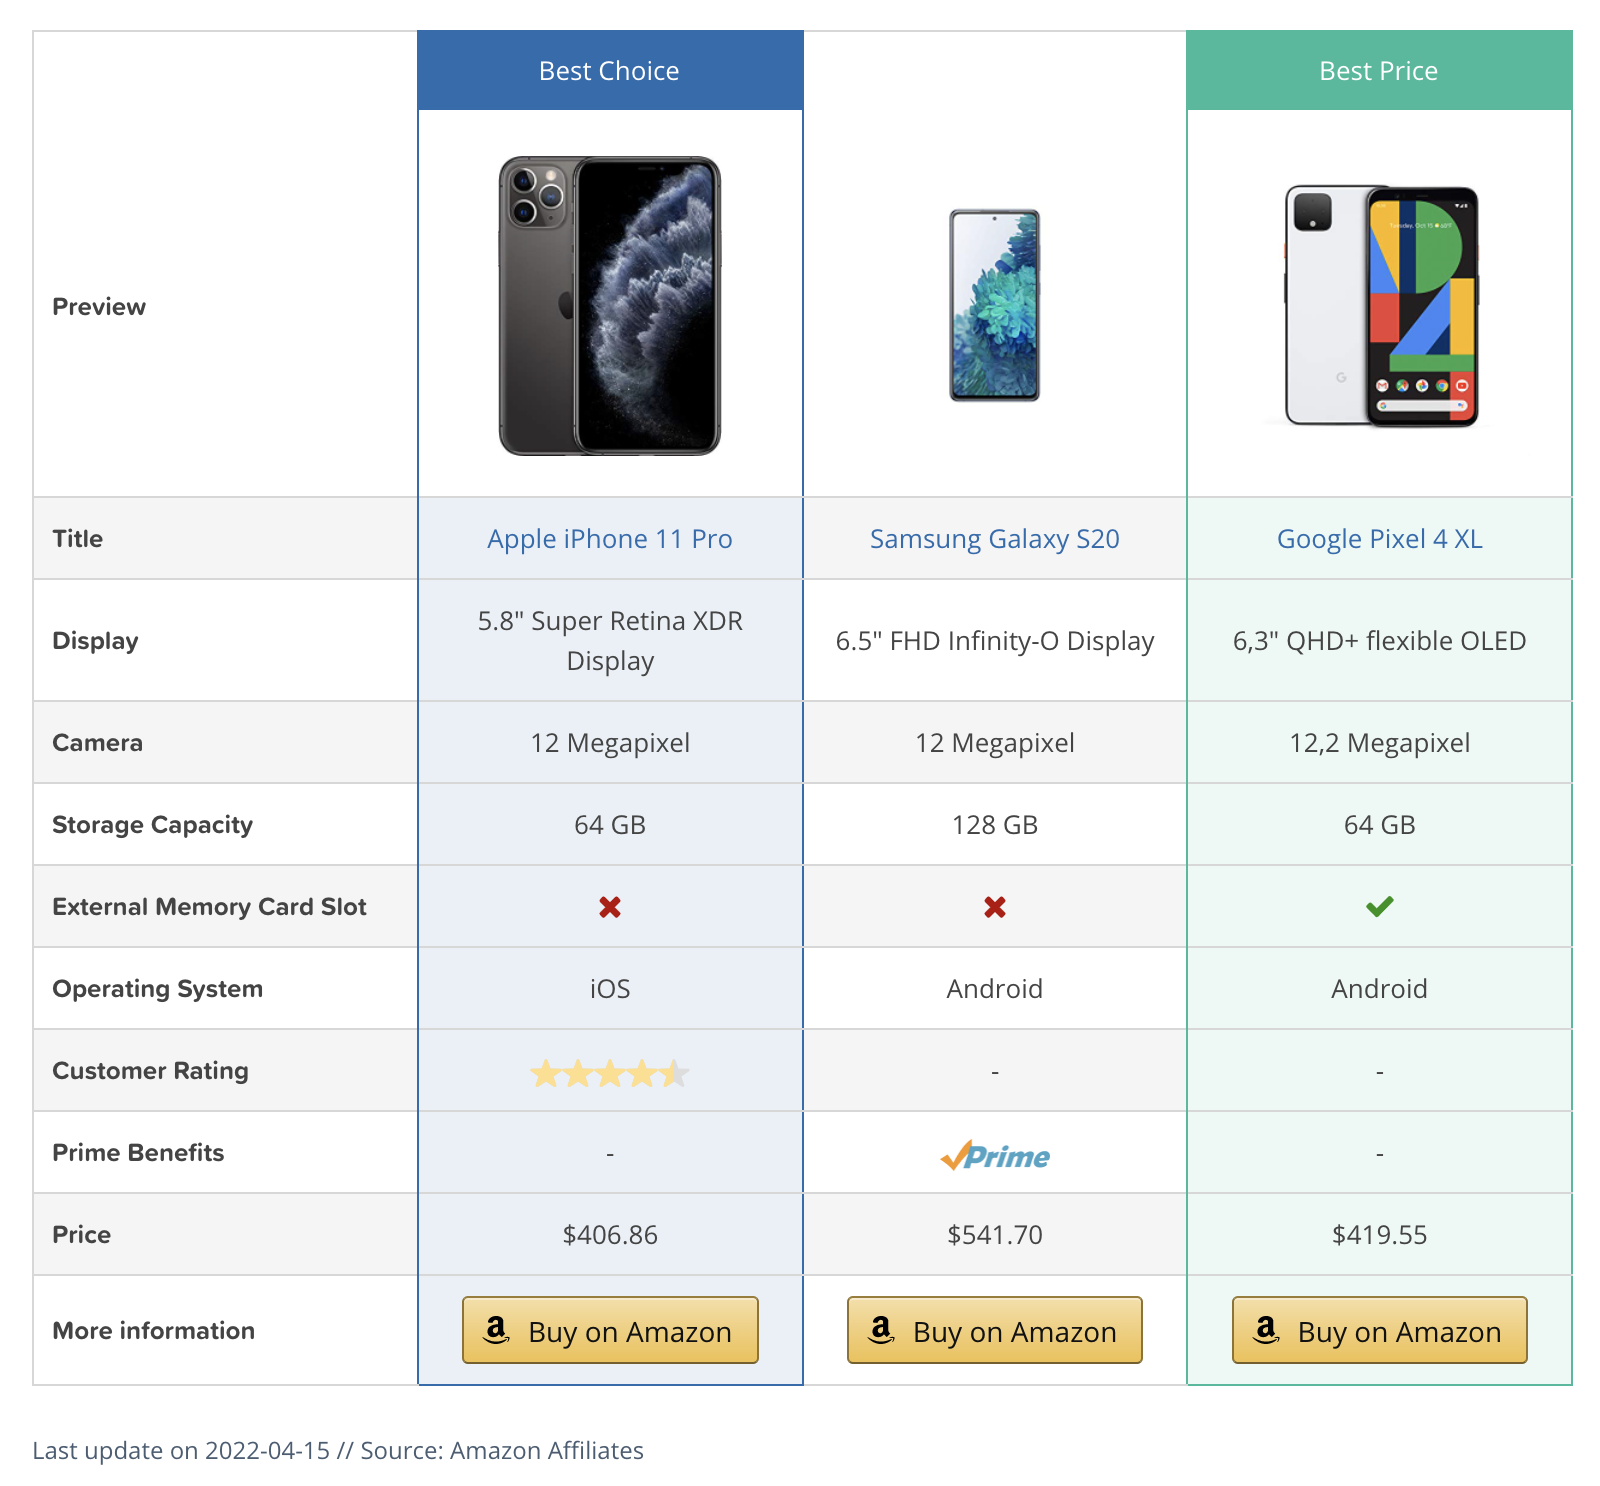
AAWP allows you to compare different Amazon products to make the purchase decision much easier for your audience. You can display product features, advantages and disadvantages as well as their prices and ratings. And apart from one small limitation, this all runs fully automatically. Since the product features are not provided by Amazon via their Product Advertising API, you unfortunately have to insert them manually. But compared to the price and the ratings, these do not have to be updated regularly. So, enter, set and forget!
Creating a table in the WP Admin is as easy as pie and is done in three simple steps.
After you have installed and activated the AAWP plugin in den WordPress admin of your site, you can start creating a new comparison table by heading over to Amazon Affiliate > Tables > New Table.

Step 1: Add Table Name and Products
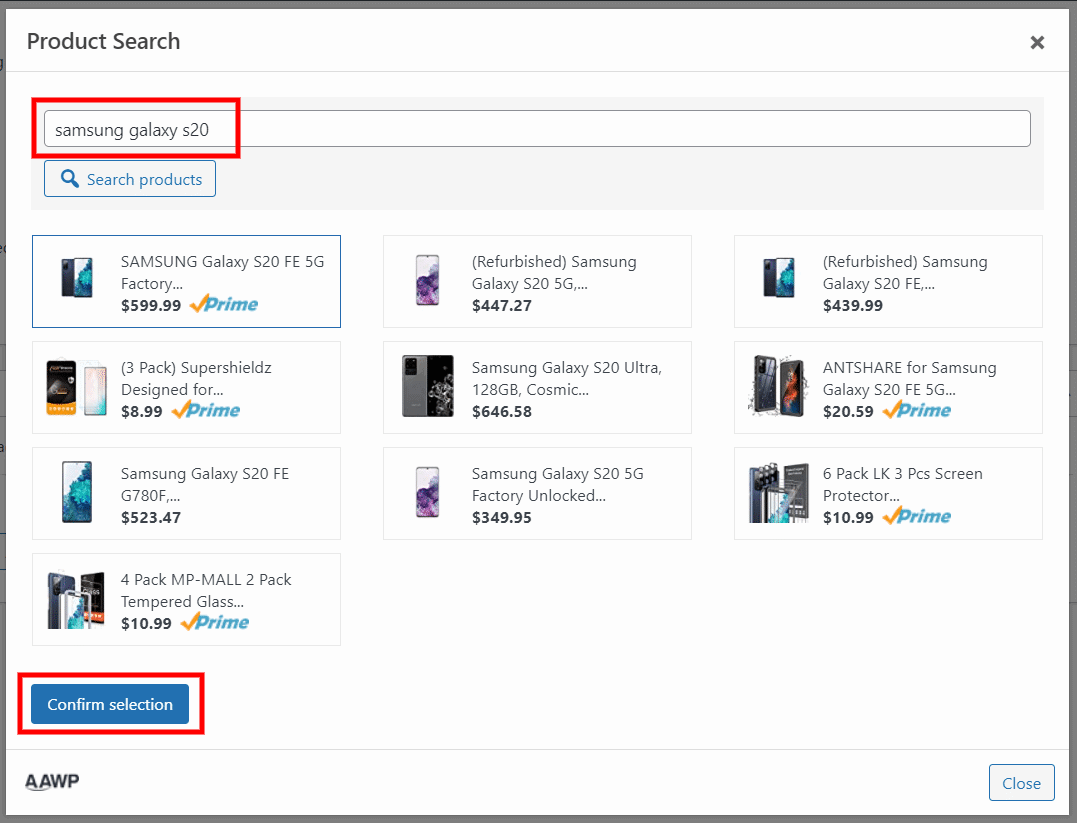
First, give the comparison table a name. Then you can add products either via ASIN or via the product search. Please note that you need at least two items for a comparison table, but no more than 3 to 5 products to keep the table simple and clear. A cluttered table has exactly the opposite effect on the user. They may be deterred and leave your website to find the desired information on your competitor’s site. Makes sense, doesn’t it? For the promotion of a single item, you should use an Amazon Product Box which can also be easily created with the AAWP plugin.
Step 2: Table Rows and Content Types

In the second step, you can create rows and content types. Depending on what you want to display in the comparison table, you can choose a compact table with only a few rows or a more detailed one with many rows. For each row, you then have to match the respective content type via a drop-down field. This is then automatically applied to all products. The following content types are currently available:
- Title
- Product image
- Price
- Prime status (logo)
- Star rating
- Amount of reviews
- Buy button
The comparison table builder is really flexible. The content type can be overwritten on a product or line basis, e.g. you can use your own product image.
In addition, you can insert shortcodes, buttons, text or even custom HTML for example to manually add the above-mentioned product features or your own custom criteria. Furthermore, predefined Yes/No elements are available. To stay with the wireless hoover example above, you can, for example, display a row “2nd battery included” with the corresponding yes/no values.
Step 3: Inserting the Table
When you have finished configuring your table, you can simply insert it into a page or post using a shortcode and start making money.
Conclusion
The first method using the Gutenberg table block is free of charge, but comes with limitations in terms of design and features. In the long run, it also requires much more effort to manually create and update prices, reviews and a disclaimer for the accuracy of the displayed prices, e.g. “Pricing as of [DATE]” or “Last updated prices on [DATE]”. Let’s be honest. You probably only update that in the beginning. As your website gets more and more traffic, you won’t have time for that either.
Therefore, you should really take a closer look at AAWP. In addition to mobile responsive comparison tables, AAWP offers you many other features, such as automatic data updates, a “Last update” field shortcode, Amazon Partner Networks in 14 countries, geo-targeting, product boxes, beststeller lists, AMP support, and much more. Not to mention the time you save using the AAWP Table Builder, which you can then spend entirely on your engaging blog post content.
AAWP Pricing
You get all this for a price of just €49 for the Personal plan which is good for one WordPress site and includes one year of updates and support for free. Subsequent years are automatically renewed unless you cancel your subscription. But why would you do that? Multisite is included in Plus, Pro and Ultimate plans. All pricing plans include all core features and only differ in the number of websites you can use the Amazon Affiliate Plugin for.
You should be able to recoup the price of the plugin easily within a year through affiliate income, right? Lastly, the AAWP developers offer a 30-day money-back guarantee. During this period, you can put the plugin through its paces and find out whether it is suitable for your business needs.
Check Out AAWP – The Amazon Affiliate WordPress Plugin »
By the way, the product data is provided directly by the Amazon Product Advertising API. This ensures that (almost) all data is always up to date and – very important – Amazon compliant.

Biff Codes - The Job Board for WordPress Devs
Biff.codes is on a mission to revolutionize job boards. Post and find WordPress developer jobs for free.
FTC Disclosure: We may receive a payment in connection with purchases of products or services featured in this post.


Add your first comment to this post