Curated blog with news, events, listings, jobs and exciting stories about web design & web development.
How To Create Multi-Page Forms Your Audience Will Love
Sometimes I find a service or product online and am immediately hooked. Unfortunately, the initial enthusiasm often gives way to a certain disillusionment when I have to fill out an almost endless form to either get more information about it or to actually order it. If this also applies to your site, you should try to keep the number of fields to a minimum. However, if the form is still too long, there is a simple solution to get all the user information you need, but without boring them to death. If you use WordPress together with WPForms, you can easily benefit from multi-page forms.
WPForms – The Beginner Friendly WordPress Form Builder »
Multi-Page Forms
Splitting a long form into multiple pages helps to reduce form abandonment rate and dramatically improve the user experience. The form may still be very long. However, by splitting it into multiple pieces, it appears to be shorter, which helps combat form fatigue and gives you more form conversions. An easy and simple trick!


Let’s find out how to create a multi-page form with WPForms.
As always, with the WordPress form plugin you don’t need a degree in rocket science or an expensive developer, you can do it all yourself via its intuitive drag & drop interface. It’s just a few simple steps to make your audience happy:
- Form Creation
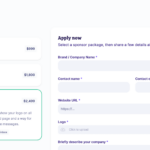
Create a form with as many fields as you need. This could be a complex order form, request a quote from, or a user registration form for instance. - Form Splitting
Now to the fun part: Split your long form into various parts simply by dragging and dropping a Page Break form field which can be found in the Fancy Fields section of WPForms. As already mentioned, it is not overly complicated, is it? - Progress Bar Customization
Then you might want to customize the progress bar to inform users about the various sections of your form. This way they know exactly how much they have left to fill out before finally submitting the form. You can choose from three different styles including connectors, circles, and progress bars. In the form editor, simply click on the First Page break section to open a new customization panel. - Form Settings
Once that is done, you should navigate to Settings > General to configure various aspects of your form including form name, description, submit button text, SPAM prevention, AJAX forms, and GDPR enhancements. - Form Notifications
You should enable this, because you certainly don’t want to miss a form submission, do you?Via smart tags you can even send a notification to a user’s email address once he or she has submitted a form. - Form Confirmations
You can choose from three confirmation types. You can either display a message informing a user that his or her form was processed or redirect a user to a dedicated “Thank You” page. The third option allows you to redirect a user to a third-party website.
Now you just have to insert the form into your WordPress page. This is as easy as with any other Gutenberg block.
WPForms – The Beginner Friendly WordPress Form Builder »

Biff Codes - The Job Board for WordPress Devs
Biff.codes is on a mission to revolutionize job boards. Post and find WordPress developer jobs for free.
FTC Disclosure: We may receive a payment in connection with purchases of products or services featured in this post.


Add your first comment to this post